Shaping a Lawn


The shape of the lawn is obvious at all times of the year, especially in winter when it becomes the dominant patch of green in the garden. Often the shape of the lawn is determined by the shape of the plot: rectangular garden, rectangular lawn. This results in borders of even width and long straight lines that do nothing for the interest and perspective of the garden.Just by taking out the corners of a rectangular lawn, and making the lawn more elliptical, the beds become deeper in the corners of the garden allowing more substantial planting, creating a more interesting picture. A similar effect can be created by using a round lawn in a square garden. This is a simple formula that works and is pleasing to the eye. Discover how to shape a lawn easily in 6 simple steps.
The shape of the lawn is obvious at all times of the year, especially in winter when it becomes the dominant patch of green in the garden. Often the shape of the lawn is determined by the shape of the plot: rectangular garden, rectangular lawn. This results in borders of even width and long straight lines that do nothing for the interest and perspective of the garden.Just by taking out the corners of a rectangular lawn, and making the lawn more elliptical, the beds become deeper in the corners of the garden allowing more substantial planting, creating a more interesting picture. A similar effect can be created by using a round lawn in a square garden. This is a simple formula that works and is pleasing to the eye.
Looking from the house a lawn of this shape opens up towards the center of the garden and tapers in the distance, this increases the perspective making the plot look longer.
Superimposing a sharply outlined shape onto an ill-defined lawn area transforms the look of the whole plot. Geometric forms give a sharp, contemporary look but a simple circle fits any style. Don’t worry if the space you have won’t accommodate a whole circle. A simple arc with rectangular shapes cutting in to it looks just as stylish. For larger lawns play around with different combinations – two overlapping circles, for example. The trick to getting the look is to cut a precision edge. Lawn edging strip is essential if you are mulching borders with a stone aggregate, but cutting a vertical edge, pulling back the border soil and mulching with bark also works.
You need:
- Sand, or can of white, line marker spray paint
- Half moon turf cutter
- Sharp border spade
- Lawn edging strip
- Fine slate chippings or decorative gravel or fine milled decorative bark
Instructions:
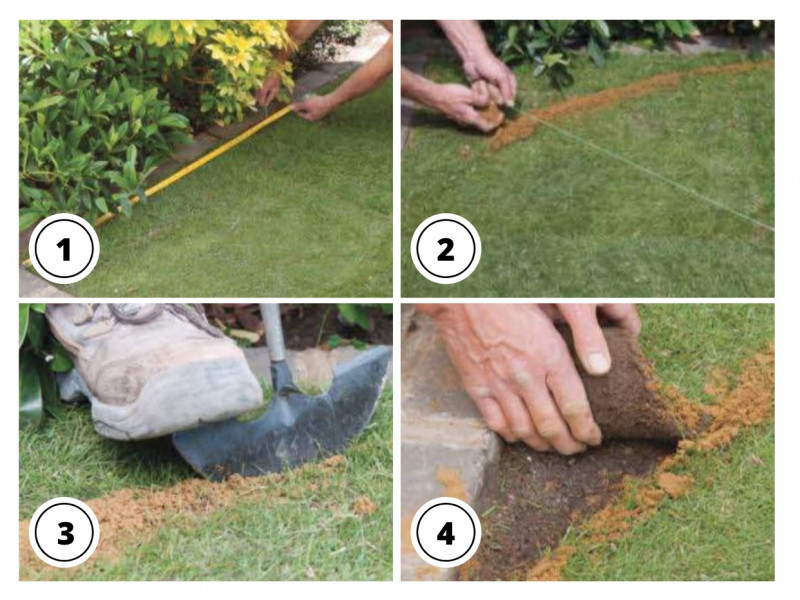
Step 1. Measure up. Decide on the new shape for your lawn and sketch it out on paper. To create a curve, first measure out a square with a tape measure, marking the corners.
Step 2. Mark the circumference Place a bamboo cane at the corner of the square opposite where your curved edge will be. Attach a string to it then pulling the string taut, mark out the edge of the circle with sand.
Step 3. Cut out the shape. Use a half moon tool or a flat spade to cut a vertical edge following the sand line. This separates the turf cleanly and the slot will be used later to take the edging.
Step 4. Remove the turf. On newly laid turf, grass should peel back, but on established turf use a sharp border spade to slice through the roots, removing a generous depth of sod.
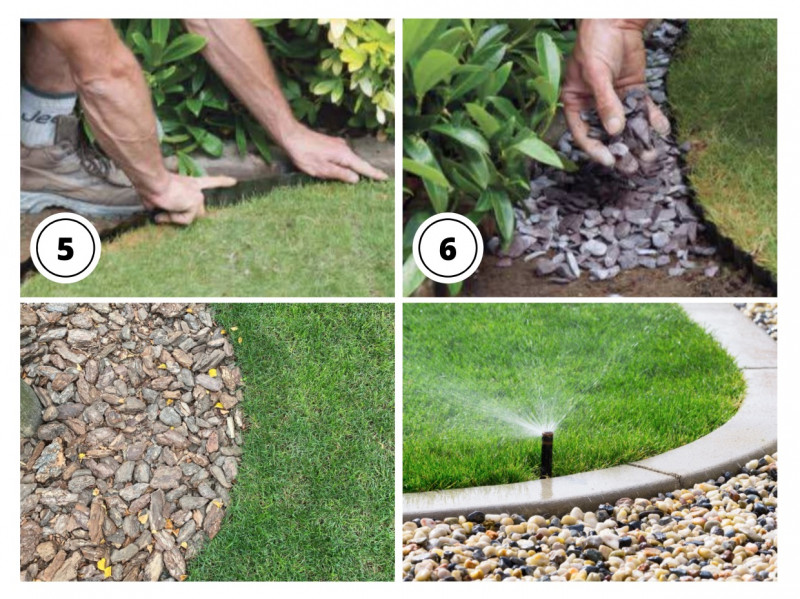
Step 5. Add the lawn edging. Push lawn edging strip down into the slit you made previously. The edging should be fractionally below the lawn surface allowing you to mow over it easily.
Step 6. Fill with slate. To define the shape and hide the edging, add fine slate chippings or gravel. To protect mower blades from damage, the mulch should be just below the strip.
Tip: In an attempt to make a lawn more interesting wavy edged borders are often created. These look contrived and fussy and become even more complicated when plants grow in the borders. Curves should be soft and sweeping and lead the eye; they need to be there for a reason. Lawns with too many curves and difficult corners are difficult to cut and will gradually look untidy as the season progresses, unless an undue amount of time is invested in maintenance.